“Bins” for Windows 7 is *Bleeping* Awesome

I have a problem. I can’t fit all the icons I would like on my taskbar because I end up with 2 rows of icons when I’m undocked. There are ugly-workarounds like putting the taskbar into small (read ugly) icon mode or waste space with a double-high taskbar. I have to pick my most favoritest apps to pin on the taskbar and put the rest that I used slightly less frequently into the start menu ghetto. I like that icons don’t jump around on me on the Windows 7 taskbar but I always wished it had some smooth icon scaling like in OS X.

I just found something better, though. It’s called “Bins” and it allows you to group icons on the taskbar together just like folders in iOS or Lion’s “Launch Pad”.

taskbar-bins

It works exactly like you would want. You can choose one of the apps in a bin as the default icon. The default app is the one that gets launched if you just click the "bin" or middle-click the bin to launch a new instance. To launch any other app in the bin you roll over and click it. The rollover is super-fast and smooth. Aero peek still works. Jump-list gestures are gone but they do work by right-clicking on an icon in a bin.

bins-peek

As a bonus, Bins also lets me pin the recycle bin to the task bar just like in OS X, although I pinned it to the leftmost position. I can just drag stuff onto that taskbar icon to trash them and it never gets covered up. You can also pin Explorer shortcuts to the Explorer bin to get one-click access to your favorite folders.

taskbar-recycle-bin

I was easily able to fit everything on my taskbar that was previously exiled to the Start Menu ghetto.

This little app is awesome. It’s well worth the $5 asking price and, by the way, Microsoft should just acquire this company and incorporate the concept into Windows 8. Get it at oneupindustries.com.

via lifehacker

Update

After about 2 weeks with Bins, I uninstalled the product. While it does make the taskbar much more compact and is great for launching apps, it is not as good for task switching. What I found is that it requires quite a bit more manual dexterity to switch windows. I tend to have a lot of apps open simultaneously, so the task switching turned out to be a deal killer for me. Scott Hanselman has named Bins one of his 5 absolutely essential utilities, though.

Hide VMWare Virtual Network Interfaces from Windows Firewall and Network and Sharing Center

VMWare Workstation creates two virtual network adapters by default. One is the host-only network and the other is for NAT routing. You can add several more to suit your needs for more complex scenarios.

The problem is that these networks cause Windows 7 to think it is attached to a public “unidentified network” which has the side-effect of disabling network and printer sharing. You will experience the same problem with Windows 7 Virtual PC if you create virtual loopback device adapters and the same problem occurs with VirtualBox.

The solution is to mark the virtual network adapters as *NdisDeviceType=1 in the registry:

*NdisDeviceType

The type of the device. The default value is zero, which indicates a standard networking device that connects to a network. Set *NdisDeviceType to NDIS_DEVICE_TYPE_ENDPOINT (1) if this device is an endpoint device and is not a true network interface that connects to a network. For example, you must specify NDIS_DEVICE_TYPE_ENDPOINT for devices such as smart phones that use a networking infrastructure to communicate to the local computer system but do not provide connectivity to an external network.

Note  Windows Vista automatically identifies and monitors the networks a computer connects to. If the NDIS_DEVICE_TYPE_ENDPOINT flag is set, the device is an endpoint device and is not a connection to a true external network. Consequently, Windows ignores the endpoint device when it identifies networks. The Network Awareness APIs indicate that the device does not connect the computer to a network. For end users in this situation, the Network and Sharing Center and the network icon in the notification area do not show the NDIS endpoint device as connected. However, the connection is shown in the Network Connections Folder.

As far as I’m concerned this is just a bug in both VirtualBox and VMware Workstation. They should be marking their virtual network devices as *NdisDeviceType=1 for compatibility with NT 6.x –based operating systems.

Until they do that, I cobbled together a little powershell script to find any NICs created by VMWare and mark them as virtual. The setting takes affect after a reboot.

# tell windows that VMWare Network Adapters
# is not a true network interface that connects to a network
# see http://msdn.microsoft.com/en-us/library/ff557037(VS.85).aspx
pushd
echo "Marking VMWare Virtual Ethernet Adapters as virtual.`r`n"
cd 'HKLM:\system\CurrentControlSet\control\class\{4D36E972-E325-11CE-BFC1-08002BE10318}'
ls ???? | where { ($_ | get-itemproperty).DriverDesc `
-like 'VMware Virtual Ethernet Adapter *' } | `
% { $_ | new-itemproperty -name '*NdisDeviceType' -PropertyType dword -value 1 } | `
% { "`"" + ($_ | get-itemproperty).DriverDesc + "`" -> *NdisDeviceType=1" } 
echo "`r`nReboot to apply changes."
popd

Reducing the Need for Manual Reload of Color Calibration when Docking in Windows 7

Windows 7 has native support for monitor color calibration (though the OS X calibration wizard is more advanced). Unfortunately, at least with my MacBook Pro 5,3 and Apple Cinema display, Windows unloads the calibrations every time the external display is hot-plugged into my laptop. This forces me to go to Control Panel | Color Management | Advanced and click Reload current calibrations on a regular basis. I’ve even pinned this applet to my start menu for this purpose.

I’ve been looking for a command-line way to invoke this so that I can automate it and haven’t come up with anything other than possibly invoking colorcpl.exe and programmatically selecting the Advanced tab and sending a click to the Reload current calibrations button. However, poking around, I recently discovered that there is a scheduled task “\Microsoft\Windows\WindowsColorSystem\Calibration Loader”. This thing appears to do exactly what I want: reload the current calibrations.

The Action of the task is a “Custom Hander” which means it’s a COM handler. The XML definition of this task is in “%systemroot%\System32\Tasks\Microsoft\Windows\WindowsColorSystem\Calibration Loader”. Looking in there you will find the COM CLSID:

  <Actions Context="Group">
    <ComHandler>
      <ClassId>{B210D694-C8DF-490D-9576-9E20CDBC20BD}</ClassId>
    </ComHandler>
  </Actions>

I’ll have to dig into that at a later time.

Meanwhile, my main use-case is docking my laptop which usually has a closed lid or has just been re-opened so it is waking from sleep and locked. There are system events defined for those cases. The other case is just hot-plugging my monitor which is comparatively rare and doesn’t seem to generate an event. In any case, I can add the resume-from-sleep and workstation-unlocked events to the triggers for the calibration re-load task. This largely addresses my issues.

In Scheduled Tasks, navigate to \Microsoft\Windows\WindowsColorSystem and open Calibration Loader. Go to Triggers and add two new events to trigger the task.

Add On Wakeup Event Trigger

resume-from-sleep

  • Begin the task: On an event
      • Basic
      • Log: System
      • Source: Power-Troubleshooter
      • Event ID: 1
      • [check] Delay task for: 5 seconds (optional, I’m experimenting with this)

Add On Workstation Unlock Event Trigger

on-workstation-unlock

  • Begin the task: On workstation unlock
  • Any user

Remaining Annoyances

If you have a MacBook and like to customize the brightness of your external Cinematic Display and/or you like have overridden the default behavior so that function keys behave like function keys rather than Mac OS X-like macro keys by default, then you find when you hot dock your settings aren’t respected. The problem is that when a monitor or keyboard is hot docked, the bootcamp.exe process that interfaces with the Apple system controller doesn’t apply your settings. The solution is to restart bootcamp.exe.

I have a simple convenience powershell script to restart bootcamp.exe.

get-process | where { $_.Name -eq 'bootcamp' } | stop-process
start-process 'C:\Program Files\Boot Camp\Bootcamp.exe'

You may wish to have this also run on an event trigger. However, if you do, the annoyance is that it will litter your system tray with dead “Boot Camp” black diamond icons. I tend to have a powershell console open all the time, so I just invoke the script manually whenever I dock my monitor and keyboard.

“Security Suite” Subscriptions are the Dumbest Idea in Computer Security

I recently came across a 2005 essay by Marcus Ranum entitled “The Six Dumbest Ideas in Computer Security”. #1 on Ranum’s list is “Default Permit”.

Another place where "Default Permit" crops up is in how we typically approach code execution on our systems. The default is to permit anything on your machine to execute if you click on it, unless its execution is denied by something like an antivirus program or a spyware blocker. If you think about that for a few seconds, you’ll realize what a dumb idea that is. On my computer here I run about 15 different applications on a regular basis. There are probably another 20 or 30 installed that I use every couple of months or so. I still don’t understand why operating systems are so dumb that they let any old virus or piece of spyware execute without even asking me. That’s "Default Permit."

#2 on Ranum’s list is a special case of #1 which he calls “Enumerating Badness”. Basically what that boils down to is keeping a running list of “bad” stuff and preventing that from happening.

"Enumerating Badness" is the idea behind a huge number of security products and systems, from anti-virus to intrusion detection, intrusion prevention, application security, and "deep packet inspection" firewalls. What these programs and devices do is outsource your process of knowing what’s good. Instead of you taking the time to list the 30 or so legitimate things you need to do, it’s easier to pay $29.95/year to someone else who will try to maintain an exhaustive list of all the evil in the world. Except, unfortunately, your badness expert will get $29.95/year for the antivirus list, another $29.95/year for the spyware list, and you’ll buy a $19.95 "personal firewall" that has application control for network applications. By the time you’re done paying other people to enumerate all the malware your system could come in contact with, you’ll more than double the cost of your "inexpensive" desktop operating system.

The prices have gone up a bit with inflation:

  • Norton Internet Security Suite $70/year
  • Kaspersky PURE Total Security $90/year
  • McAfee Total Protection $90/year

Basically what you get for your $60-90/year is a system that double-checks everything that you try to do isn’t something bad that it knows about and if it is tries to stop it and if it lets something nasty happen tries to fix it later. You have no guarantee that something bad won’t happen because your computer still defaults to executing all code and, as a bonus, your expensive new computer now runs like molasses.

Default Deny is an Available Option in Windows 7 (but not by default)

Windows 7 ships with a semi-obscure enterprise feature called AppLocker. What AppLocker can do is deny execution to all programs, scripts, installers and DLLs by default. Instead of the normal situation where everything runs, only the code that matches ApplLockers known-good rules is allowed to execute. It works in conjunction with non-administrator user accounts to ensure that the only code executing on your system is code you want executing. This sleeper that nobody has ever heard of is more effective at stopping malware than any security suite on the market can ever be.

Why does this work? Your every day account has limited rights so it can’t write files into protected parts of the operating system but only software installed into protected parts of the operating system are allowed to execute. That means its impossible to execute downloads, email attachments, files on USB drives or whatever. Even if your browser or a plugin like Flash is exploited by malicious code in a web page, it is severely limited in the damage it can do. The usual end game of browser exploit code is to download malware onto your computer, install it somewhere and execute it. With an AppLocker default deny policy the end game can’t happen. This makes an anti-malware system something of an afterthought. Antimalware software becomes nothing more than good hygiene rather than the beachhead of your computer security, so make sure to use something that is free, lightweight and unobtrusive.

The catch is that AppLocker is an “Enterprise” feature that is only available in Windows 7 Enterprise or Ultimate editions. Also, there is configured through the Group Policy enterprise management tool which is targeted at professional systems administrators rather than normal people.

It turns out to also be cheaper to upgrade to Windows 7 Ultimate than to pay for 3 years of anti-malware. Let’s assume that your computer has a 3-year life.

Windows Anytime Upgrade Price List

  • Windows 7 Starter to Windows 7 Ultimate: $164.99 or $55/year amortized over 3 years
  • Windows 7 Home Premium to Windows 7 Ultimate: $139.99 or $47/year amortized over 3 years
  • Windows 7 Professional to Windows 7 Ultimate: $129.99 or $43/year amortized over 3 years

Even if it weren’t cheaper than massive security suites, enabling a default deny execution policy is so fundamentally right it is crazy not to do it. Any corporate IT department deploying Windows 7 without enabling AppLocker is either incompetent or the organization places no value on information security. For home users, the configuration is doable but it is “enterprisey” which means the configuration interface is too daunting for most people.

If Microsoft cares about protecting its users, it should enhance AppLocker so that it has a consumer-friendly configuration interface and it should turn on AppLocker by default in all SKUs, just like the Windows Firewall is on by default.

The day can’t come soon enough that Windows ships with a default deny firewall and a default deny execution policy and limited rights users by default. Maybe it will all come together in Windows 8.

Pin Netbeans 6.9 to Windows 7 x64 Taskbar

netbeans-x64-bugIf you try to pin Netbeans 6.9 to the Windows 7 x64 taskbar and have the x64 JDK running, you get a new icon every time Netbeans runs. This is Netbeans bug 178273. The gist is that the netbeans.exe and nbexec.dll which bootstrap netbeans startup are 32-bit native binaries. Netbeans.exe can’t host the 64-bit Java so it copes by launching a child javaw process with a huge list of arguments.

nb-daughter-javaw-process

A possible solution would be to create a shortcut to Javaw with all the arguments for Netbeans and pin that to the Taskbar. Unfortunately, the list of arguments is so large that it isn’t possible to create a shortcut directly to javaw passing everything in. The list gets truncated and the shortcut doesn’t work.

A workable solution is to install the 32-bit JDK and make that the default platform for Netbeans. This works but you have to override the installer which prefers to put Netbeans into the x64 Program Files tree and use the x64 JDK if it is detected.

netbeans-32-bit-sdk-override

This does solve the problem but it’s not that pretty. The downside here is you have to maintain a second 32-bit JDK. You can still build applications with the x64 JDK but you have to fiddle around with registering the extra x64 platform in Netbeans and you have to reference the correct platform in each project.

SevenBeans Plug-In Does it Better

Jump ListSevenBeans is a Netbeans plugin that improves Netbeans Windows 7 taskbar integration. It adds jumplists, icon overlays and taskbar progress bar for background processes in Netbeans such as updating plugins. It fixes the taskbar integration whether you use the x64 or the x86 JDK
SevenBeans uses a native J7Goodies native DLL for integrating with the Windows 7 taskbar which it extracts  J7G<random-number>.tmp in your Temp directory and dynamically loads. If you are using AppLocker DLL rules, you need to create a per-user white list for C:\Users\<username>\AppData\Local\Temp\J7G*.tmp

Once SevenBeans is installed, launch Netbeans and then pin icon you have after Netbeans is up and running to the taskbar.

SevenBeans is cool and it is much nicer than dealing with an extra JDK installation that I didn’t want.

Really Least-Privilege Development: AppLocker and Visual Studio

AppLocker is a software execution policy tool in Windows 7 Enterprise and Ultimate and Windows Server 2008 R2. An AppLocker policy can be used to shift Windows from a  model where execution of code is permitted by default to a model where execution is denied by default. AppLocker is aware of binary exe, DLL/OCX, the scripting engines that ship with Windows and Windows Installer packages. The default rule sets for these categories will only allow code that is installed into the system or program files directories to execute. Once AppLocker is turned on, execution of code is denied by default and an unprivileged user cannot add executable code to the system.

If untrusted users can’t execute new code, then how can Visual Studio possibly work without making developers admin?

Grant Execute on Source/Build Tree: Fail

I thought this would be super simple and that all I would have to do was create Executable, DLL and Script path rules to grant execute on my source tree. At first, it seemed to work and I was off and running. Then I tried to build a big complicated project and the build failed all of a sudden. This solution had post-build rules but so what? I had script enabled for the build tree.

Build Actions Fail

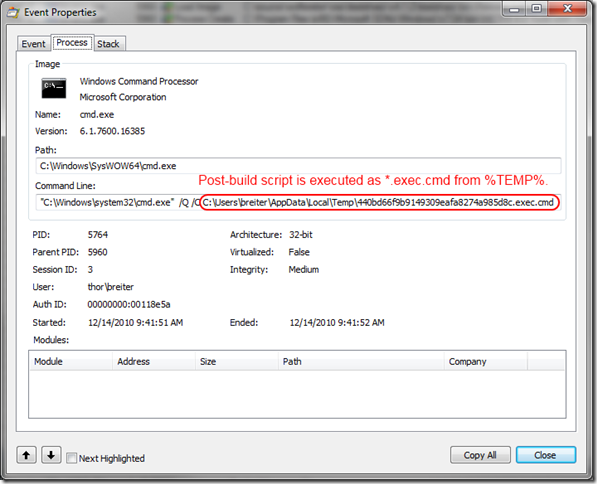
Procmon shows that the pre- and post-build events are implemented as temporary batch scripts in %TEMP%. They are named <cryptic-number>.exec.cmd.

procmon-postbuild

Unfortunately %TEMP% is not a usable macro in AppLocker. You have to either create a generic Script rule to allow all *.exec.cmd scripts to execute or create rules for each Visual Studio user like C:\Users\<username>\AppData\Local\Temp\*.exec.cmd. Either way, post-build actions will start to work.

Web Apps Crash with Yellow Screen of Death

Another issue is that running Web apps with the built-in Visual Studio Development Web Server (aka Cassini) fails miserably. The obvious clue that this is AppLocker is “The program was blocked by group policy.”

webdev.webserver20-yellowdeath

The problem is that Cassini copies the DLLs and runs them from a subdirectory of %TEMP%\Temporary ASP.NET Files\.

webdev.webserver20-temp


In order for Cassini to work, you have to disable DLL rules or  create a DLL allow path rule for every developer in the form C:\Users\<username>\AppData\Local\Temp\Temporary ASP.NET Files\*.dll.

Visual Studio’s HelpLibAgent.exe Crashes

This one is a bit weirder and more surprising. Visual Studio 2010 has a new help system that operates as a local HTTP server. Invoking help with AppLocker DLL rules enabled generates a serious crash.

helplibagent-crash

I’m not sure why it does this but HelpLibAgent.exe generates a random string and then two .cs files based on that string and invokes the C# compiler to generate a DLL based on the random string which is dynamically loaded by HelpLibAgent. This seems weird on the face of it that and there’s nothing in that code that looks like it has to be generated on a per-user basis at all. Weird, weird, weird.

helplibagent-dll-compile

In order for this to work you have to allow any randomly named dll to load out of %TEMP% which means disabling DLL rules or modifying the rule that was necessary for Cassini:

C:\Users\<username>\AppData\Local\Temp\*.dll.

Summary

In order to run Visual Studio with AppLocker a user needs the following rules:

  • DLL, EXE and Script: Allow path on source tree / build directory structure
  • Script: Allow path on %TEMP%\*.cmd.exec
  • DLL: Allow path on %TEMP%\*.dll
  • Unfortunately %TEMP% is not available in AppLocker so a C:\Users\<username>\AppData\Local\Temp\* for every <username> needed has to exist. These are probably best implemented as local policies.
  • Optional: Allow script *.ps1. (This is pretty safe because PowerShell has its own tight script execution security model.)
  • It’s unfortunate that DLL rules have to be enabled for a well-known location like %TEMP% but that still doesn’t make the DLL rule useless.

    • OCX is still not permitted from %TEMP%
    • AppLocker DLL rules are complementary to CWDIllegalInDllSearch for mitigating DLL Hijacking because it provides a more granular options. This is particularly important if you need to use a global CWDIllegalInDllSearch setting of 1 or 2 for compatibility reasons.
    Once these rules are in place, the experience is seamless. The rules don’t get in the way of anything.
    Note that AppLocker script rules only apply to the scripting hosts that ship with Windows: CMD, Windows Scripting Host (.vbs and .js) and PowerShell). Perl, Python, Ruby, etc interpreters are not affected by AppLocker policy. Similarly, execution of Java jar files are not affected by AppLocker.
    It would be nice if DLL rules were a little smarter. For instance, I would like to be able to allow managed DLLs on some path but not native code.

WorkAround: Console2 + Telnet.exe on Windows 7 Crashes ConHost.exe

conshost-croak

Entering the Windows telnet.exe prompt mode causes the shell process underneath Console2 to crash on Windows 7. You can reproduce this by just invoking telnet with no arguments in a Console2 session. An alternate route to hit this is exiting a telnet session with CTRL+].

The symptom is Console2 freezing because it is no longer getting text from its slaved native console followed up with a crash dialog for conhost.exe and whetever your shell was.

Unhandled exception at 0xffdd1df9 in conhost.exe: 0xC0000005: Access violation reading location 0x0000000003385460.>    conhost.exe!SB_StreamWriteToScreenBuffer()  + 0x61 bytes   

A workaround is to launch telnet into a separate conhost.exe window.

#force telnet.exe to start in its own console window. 
function telnet { start $env:SystemRoot\System32\telnet.exe $args }

Or use putty –P port –telnet host as an alternative to telnet.exe. (I can’t get plink.exe to be interactive with telnet for me.)

Update

Unless you need something nifty that telnet.exe is doing, a more elegant solution is to Lee Holmes’ Connect-Computer.ps1 PowerShell script as a telnet replacement.

VirtualBox Trigger Windows 7 Bug Causing it to Believe the File System is Broken

Booting for 4 hours and another hour to go

IMG_20100913_173926

VirtualBox 3.2.8 (and possibly other versions) running on Windows 7 or Windows Server 2008 R2 as the host operating sytsem triggers a bug that causes Windows 7 or Windows Server 2008 R2 to believe that NTFS is corrupt. Chkdsk then runs on every boot. In fact chkdsk is chasing a ghost. There is no corruption but on my system chkdsk takes over 5 hours to run to completion.

I don’t believe that VirtualBox is doing anything hinky. It is just unlucky to trigger a regression in NTFS.

This is a known regression in Windows 7 in the NTFS file system.  It occurs when doing a superceding [sic] rename over a file that has an atomic oplock on it (atomic oplocks are a new feature in Windows 7).  The indexer uses atomic oplocks which is why it helped when you disabled the indexer.  Explorer also uses atomic oplocks which is why you are still seeing the issue.  When this occurs STATUS_FILE_CORRUPT is incorrectly returned and the volume is marked "dirty" which is a signal to the system that chkdsk needs to be run.  No actual corruption has occured [sic].

Neal Christiansen
NTFS Development Lead

Fortunately, a hotfix already exists. Applying KB982927 appears to fix the issue for me.

Achieve Radically Better Firewire 800 Performance on Windows 7/2008/Vista x64

Microsoft is clearly ambivalent about Firewire (IEEE 1394). Windows 7 introduced a new IEEE 1394 stack but the performance remains abysmal compared to a Mac.

I have a Drobo 2nd generation device. My choice is to use slow USB 2 or a fast Firewire 800 interface. Unfortunately, large file copies over Firewire on Windows 7 or Windows Server 2008 R2 are slower than USB2. Worse, they can lock up the target device so that nothing else can access it until the file copy succeeds. I don’t have an explanation for why native Firewire support remains so lame but fortunately there is a free-of-charge solution to turbo-charge Windows Firewire performance to Mac OS X levels.

If you have a Firewire interface on your Windows 7 computer, do not hack around with legacy drivers and do not turn off the Windows write-cache buffer. Instead, download the latest ubiCore Firewire drivers for your version of Windows and install them. (Requires disconnecting all your Firewire devices and a reboot.)

Enjoy the painless 800 Mbps file copies.

Highly recommended.

FIXED: Boot Camp Audio Pops and Crackles with Windows 7 x64

Speaker_IconI have passed the 96 hour mark with a working fix for my audio problems with Boot Camp 3.1 running Windows 7 x64. To recap, I recently did a fresh installation of Windows 7 on my Mac Book Pro unibody (late 2009). Afterward, I started getting audio anomalies in the form of loud pops and permanent crackle distortions. These went away if I restarted audiosrv or reset the drivers in any way. For example, unplugging and plugging the speakers back into the minijack would fix it for a while as would turning audio enhancements on and off in the control panel for one of the devices.

I tried getting the latest Crystal Audio driver from Apple and  a solution from the interwebs that suggested disabling 802.11a. I also dug up a much newer version of the Broadcom wireless network card driver than Apple is distributing. I tried fiddling with Skype, which seemed to be part of the problem. I also disabled the USB audio device in my Apple Cinematic Display. None of these interventions totally solved the problem.

Then I came across a KB article that describes a similar but different issue with USB audio:

  • You attach a USB audio device to a computer that is running Windows 7 or Windows Server 2008 R2.
  • You configure this device as the default audio device.
  • You put the computer into the S3 sleep mode while an application plays audio.
  • You disconnect the USB audio device while the computer is in the S3 sleep mode.
  • You resume the computer from the S3 sleep mode.

In this scenario, the application that was playing audio stops responding. Additionally, all the other audio-related applications stop responding. For example, Volume Mixer also stops responding.

This is similar. My problems with mangled audio seemed to be related to power management, sleep yes but also not exclusively. My symptoms were much less extreme than the ones described: corruption instead of outright failure. The hotfix replaces the usbaudio.sys driver that shipped with Windows 7/2008R2 gold with a new version from July 14, 2010. What the heck, usbaudio.sys, is being used by one of the audio devices so I decided to give it a try.

Viola. It fixed my issue. I have had no audio squirreliness in 4 days where I previously could not have gone 4 hours.

What has me really scratching my head is how did I not have this problem before? I was running Windows 7 for a year on this computer and I didn’t really notice much of an audio problem until two weeks ago. Maybe it is the sort of thing that you don’t notice until you do and then you really notice.

Microsoft KB article 2122063: “The audio applications stop responding in Windows 7 or in Windows Server 2008 R2 after you resume the computer from the S3 sleep mode”